Good afternoon, please tell mehow to transfer Windows to another hard drivewithout reinstalling the operating system. I’ll explain my situation: My Windows 8 is located on an old “badass” hard drive with a capacity of 250 GB, divided into 2 partitions. Is it possible to move the system with all installed programs to a new hard drive with a capacity of 400 GB, but unfortunately it is not empty, there is already one on it a partition with 100 GB of data and nothing should happen to it. Alexander.

Hello friends. Let's help our reader and me at the same time! I also have an old hard drive Maxstor 250 GB with Windows 8.1 installed and I have long wanted to transfer it to another hard drive Samsung (400 GB capacity), this hard drive also has files. By the way, if you transfer the operating system, it’s better to transfer it to , that’s where everything will work faster for you.
We will work with you using Acronis True Image programs and we will also need Acronis Disk Director. The operating system in our case can be any, for example Windows 7, 8, 8.1, 10. The entire transfer process is described in our article step by step and I think you will succeed.
You may also find our other articles on this topic useful:
- A similar article, only the tool used is Cloning. .
- A very simple article where we do the same thing using the free AOMEI Partition Assistant program, I recommend it to all novice users -
- If you have a laptop, then perhaps these articles will be useful to you .
- If you are interested in the article, visit the special section where you can find from one storage device to another.
Disk Management window
So, we have two hard drives:
Disk 0. Samsung hard drive(400 GB capacity) with one partition. Everything is clear with this disk, there is one partition on it and there are 100 GB of data with which nothing should happen. We will transfer the operating system to it from the Maxstor hard drive or Disk 1.
Disc 1. Maxstor hard drive 250 GB with three partitions.
The first partition is hidden and does not have a letter, it is called System Reserved, the volume is 350 MB, the main purpose of the hidden partition is to store Windows 7 or Windows 8 download files. We will move it. When transferring operating systems, this section with Windows boot files must be included in the backup.
The second partition under the letter (C:) has a capacity of 105.00 GB and has the Windows 8.1 operating system installed on it. We will also reschedule.
The third partition under the letter (D:) has a volume of 127.00 GB with user data. We won't reschedule.

Acronis Disk Director
First of all, let's boot from a boot disk or bootable flash driveAcronis Disk Director and separate it from the hard drive Samsung (volume 400 GB) 130 GB space especially forWindows 8.1, which we will transfer to it from Maxstor.
Select with the left mouse the space of the Samsung hard drive (volume 400 GB) and select Resize volume
We grab the delimiter with the mouse and drag it from left to right, thereby “biting off” 130 GB of space from the Samsung hard drive for the future operating system. free up unallocated space 130 GB required at the beginning volumes . At the bottom of the window we see the future state of the partitions on the hard drive. Click OK.
Program Acronis Disk Director works in deferred operation mode. For our plans to come true, we need to press a button Apply


Continue


The first task is completed. On the Samsung disk, using Acronis Disk Director, we created 130 GB of unallocated space for the future Windows 8.1.

Acronis True Image
Creating a backup
Now we are working with the Acronis True Image program. In this program, we need to create a backup of the Windows 8.1 operating system located on the Maxtor hard drive and deploy this backup to unallocated Samsung disk space.
We also boot the computer from the boot disk Acronis True Image. In the initial window of the program, select
Backup. Disks.

Window Archived sections.
In this window we need to select Disc 1 sections for archiving.
In the window that appears, we see three disks:
Disc 1. Bootable USB flash drive with Acronis True Image program.
Disc 2. Samsung hard drive 400 GB , to which we will transfer Windows 8.1.
Disc 3. Maxtor hard drive250 GB(from which we are transferring Windows 8.1). To include it in the backup, check the hidden partition System Reserved, volume 350 MB, the main purpose of the hidden partition is to store Windows 7 or Windows 8 download files. When transferring operating systems, this partition with Windows download files must be included in the backup. Acronis assigned it a drive (G:), this partition does not have a letter in the operating system itself and can only be seen in Disk Management.
We also note the section with the Windows 8.1 operating system itself, here it has the letter (C:). You may have a different letter. We focus on the volume volume. Further.

Review

Here we select a Samsung disk under the letter (F:) for storing the future backup with a volume of 400 GB on the left side of the window, the files on it are displayed on the right side.


Get started

A backup of Windows 8.1 is being created on the only existing partition of the Samsung hard drive.


Turn off the computer and disconnect the old hard drive Maxstor 250 GB and leave one hard drive in the system Samsung, you definitely need to do this! After transferring the operating system, the Maxstor hard drive can be connected back.
Acronis True Image
Deploying a Windows 8.1 backup to your hard drive Samsung
Now in the system unit there is one Samsung hard drive (400 GB capacity), on this hard drive there is one partition with data and it is on this partition that there is a backup with Windows 8.1, also at the beginning of this partition an unallocated space has been created, it is to this space that we will expand backup with operating system.
Again, boot from the Acronis True Image boot disk and select Recovery. Disks. Files and folders.


We find our backup on the partition (C:) of the Samsung hard drive. Select it with the left mouse once and click OK


Click on the button New storage

Celebrating Unallocated space on our Samsung hard drive and click on the Accept button

Click on the button again New storage

Click on again Unallocated spaceAnd Accept
Selecting the target disk for MBR recovery. We mark Disk 2 Samsung (capacity 400 GB). Check the box Recover disk signature And Further. Get started Program Acronis True Image deploys a backup of the Windows 8.1 operating system to the unallocated space of the Samsung hard drive that we created in advance. Essentially, the operating system is transferred to another hard drive.


OK and reboot the computer.

Friends, if you still have hard drives connected to your system unit, you need to go to the boot menu of your computer and select the hard drive to which you transferred Windows, in my case, it is a Samsung hard drive.

After loading, go to Disk Management and see this picture.
1. A hidden partition without the letter System Reserved, volume 350 MB with Windows 8.1 download files, was transferred to the Samsung hard drive.
2. Windows 8.1 itself has also been transferred and is located under the letter (C:).
3. Nothing bad happened to the 100 GB files, only from this partition.
4. There is still an unallocated area and we will attach it to the drive (C:).

That's all

Now you can connect your old hard drive to your computer Maxstor and you will find our article useful -
After purchasing a larger disk or solid-state drive, most users reinstall the system, all drivers, and also download all the programs necessary for operation again.
This can be avoided. With a little preparation, it is possible to clone an old disk and transfer information to a new one. How to do this will be discussed in the article.
Using Acronis True Image WD Edition
A good program from a well-known developer will help if the required drive is a Western Digital brand. Since this brand has a good range of models, good performance and not very high prices, it has become widespread. If the user has one of the disks produced by this company, then the utility is perfect.
The program should only be downloaded from official website. After installation, you will need to launch it and, in the main window, select “”.
Next it will be necessary select mode. The automatic option is suitable for almost all purposes. This will copy all information from the specified disk to the second disk. The target drive will be completely cleaned before the beginning. After the process is completed, the second disk will become bootable and you can start the system from it. That is, the disk that was previously the main one can be removed and only worked with the second one. 
Seagate DiscWizard App
In fact, this disk cloning program is itself a copy of the previous program. Almost everything here is identical: the interface, capabilities and procedure. Perhaps, main difference is that the utility requires at least one drive manufactured by Seagate. 
Samsung Data Migration Program
This utility was specially created by the developer to transfer data from the main disk to a solid-state drive of the corresponding brand. Therefore, if the user needs exactly this, the utility will come in handy. 
Possesses simple interface and an algorithm of actions similar to the previous options presented in this article. But it is capable of not only completely transferring information, but can also provide its selective transfer. This is very useful, because SSD volumes, as a rule, are still smaller than hard drives. This feature solves the copying problem and will allow you to transfer only the OS with all the necessary programs, and leave the rest.
Transfer using Assistant Standard Edition
A utility suitable for moving a system. Unfortunately, can be used on Windows version seven and those released after it. Moreover, copying must be done from the MBR partition. The computer must have a BIOS or UEFI with Legacy mode.
After starting the program, in the menu on the left you will need select the specified item. After this, the utility will prompt you to select the media to which the copy will be made. After which, you can configure the partitions on the new media.
After completing all the settings in the main menu, you will need to click the “apply” button. 
And in the next window, the “Go” button, after which you just have to wait for the process to complete. 
Using Minitool Partition Wizard Bootable
In this case you need upload image from the official website, then write it to a flash drive, making it bootable. After that, you can boot from it and transfer the system without any restrictions.
In the first paragraph you need to click “ Migrate OS to SSD/HDD" After this, a wizard will launch, in which you must first select from which drive the copies will be made, and then select which one. 
In fact, the rest of the settings can be left standard. All that remains is to reach the end of the wizard and wait for the copying to finish.
Macrium Reflect
Capable of cloning disks or partitions. It also has the ability to create partitions to restore the OS in case of failures. Wherein completely free and works with devices from any manufacturer. 
After installation, all you have to do is click “ Clone this disk" and then select the starting and ending media. After which the utility will perform the transfer.
Moving your system to an SSD is an effective way to organize your computer. In addition, after purchasing a flash drive, you will not need to install the OS on it from scratch and configure all the drivers. Moving an existing system to disk will save time and free up your PC disk to store other files.
Along with the transfer of Windows, absolutely all programs, games, settings and drivers that are already installed on the PC will be moved to the SSD. You can solve the problem in one of two ways:
- Using built-in OS functions;
- Using third party utilities.
Please note that depending on the version of Windows and the parameters of the purchased flash drive, transfer methods may vary.
What data can be transferred toSSD
Storing the operating system on an SSD not only speeds up its operation, but also improves the response of other programs and files that are stored on the disk. The user can transfer the following types of data to a flash drive:
- Operating system . It is added to the SSD with all ready-made drivers and settings. In essence, a duplicate of it is created, which was previously stored on the HDD;
- Programs – choose yourself which applications you want to add to the SSD and which you want to leave on the computer’s hard drive (HDD). We advise you to leave extensive programs for video editing and software development/testing on your computer - this way they will work many times faster;
- User files . This can be any of your documents, photos, music, videos and other types of data.
Components to move
To add Windows in use to the SSD, the following objects are required:
- Installed transfer utility;
- The SSD itself;
- Computer or laptop;
- An adapter of the SATA-USB type, with which an external drive is connected to a PC.
If you only work with OS resources, you won't need to install a third-party utility to transfer.
Computer requirements
Before you perform any OS migration steps, make sure that your device meets all the minimum requirements that allow the utility to interact with the SSD and transfer large amounts of data. The minimum requirements are shown in the following table:
You can compare your computer's settings with the specifications listed above using the About window. It displays correct data about the main hardware and software components of the device:
Fig. 2 – window for viewing Windows and computer parameters
We use the built-in capabilities of Windows
Follow the instructions to transfer the operating system to a flash device:
- Open the Disk Management window. To do this, enter the command diskmgmt.msc in the Run window and confirm the action;
Fig.3 - launching disk management tool
- Now you need to reduce the size of the OS on the disk. You can perform this action using the “Shrink Volume” function. All data will remain in the same state, only the space occupied on the HDD will decrease. Right-click on the “System” section, and then on “Shrink Volume”;
Fig. 4 – Volume compression
- After successfully reducing the size of the OS, a free partition will appear in the disk layout. This means that everything was done correctly;
- Connect the drive to your computer and restart the Disk Management window;
- Now click on the “Wizard” tab and select “OS SSD Transfer” from the list;
Fig.5 - “Master” tab
- A standard utility for cloning the operating system will open. Click on the “Next” button to go to the settings;
- Click on the “Unallocated space” item and go to the next window;
Fig.6 – disk space selection
- Now you can independently change the size of the future disk or leave all parameters unchanged;
Fig.7 - changing the disk partition size
- After clicking the “Next” button, the wizard will begin moving the system. After completing the action, you can turn off the computer and the next time you boot, select the OS that is located on the SSD.
Windows will also remain on the hard drive. You can delete it or use it as a backup copy when you need to restore the system.
Fig. 8 - the result of a successful Windows move
Don't forget to click on the "Apply" button in the upper left part of the "Disk Management" window, otherwise all changes made will not be saved. If you encounter error windows or freezes during the transfer, you should reset the settings, restart your PC, and try the transfer again.
Fig.9 - applying changes
Instructions forSSD fromSamsung
Samsung has released an official utility that allows you to quickly move the OS from your hard drive to a purchased flash drive. The utility is called Samsung Data Migration. You can download it for free from the company’s official website (section “Memory” - “SSD”) or using the disk that comes with the device.
The initial program window looks like this:
Fig. 10 – Samsung Data Migration utility window
Immediately after launching the utility, connect the SSD to your computer using the appropriate adapter. Click on the “Start” button. Next, the application will automatically scan the HDD in use and display information about the remaining free space and disk partitions.
Fig. 11 – analysis of a disk with an installed copy of Windows
After analysis, the program will automatically detect the SSD connected to the computer and display it on the screen:
Fig. 12 – reconciliation of the source and destination disk
If the space that Windows occupies on the HDD does not exceed the available space on the SSD, you can immediately begin the transfer by clicking on the “Start” button. The automatic movement of all components will begin. The procedure can take from 30 minutes to 1.5 hours, depending on the version of Windows used.
Fig. 13 - successful system transfer
As a result, you will receive a notification that the operating system has been successfully cloned to the flash drive. Close the window and delete all Windows data from the HDD.
The advantage of using Samsung Data Migration is its simple interface. The program will do all the work for you and minimize the likelihood of errors or bugs appearing after transferring the OS.
What to do if during the analysis stage you find that there is not enough space for the OS on the SSD? In this case, you need to clean Windows of unused data and applications. You can do this directly in the Samsung Data Migration utility window.
Fig. 14 - Error. Not enough SSD space
After the error text appears (highlighted in red), click on the “Next” button and in a new window, delete all library files that are cluttering the system. Clean the OS until the text “Ready to clone to SSD” appears in the main utility window.
Fig. 15 – successful cleaning of unnecessary files
Acronis True Image utility
Fig. 16 – main window of the Acroins application
To move the system, connect the removable drive to the computer and in the program window, click on the “Disk cloning” - “Copy partitions” tile. In the window that opens, select automatic movement mode. It is suitable for all tasks and copies data quickly.
Fig.17 - selection of cloning mode
All partitions will be copied to the flash drive. All data that was on the SSD before cloning will be deleted. The disk itself will become bootable and can only be used to run operating systems installed on it.
Fig. 18 – copying process
Seagate DiscWizard utility
The utility completely replicates the Acronis interface. It must be used if your PC has at least one hard drive from the manufacturer Seagate. To clone, you should follow the same steps as described in the previous paragraph of the article.
Fig. 19 – Seagate Disc Wizard main window
Changing bootloader configuration
After cloning the system, a copy of the OS will remain on the computer, and every time you boot, a window will appear with a boot selection. After the transfer, we recommend that you perform a number of actions:
- Without deleting the original copy from the HDD, test the operation of Windows on the HDD. There are times when the system starts to slow down and performance deteriorates. This happens extremely rarely and depends solely on the selected SSD. As long as the first copy is not deleted, you will always have the opportunity to return to using it and remove the OS from the SSD;
- Change your system bootloader settings.
The boot manager is a built-in component that helps your computer determine which installed operating system to run. You can also configure the startup order of hardware components.
Immediately after cloning, the manager will show two systems with identical names - the original and the copied one. If Windows runs normally on an SSD, you need to remove the version that remains on the computer’s hard drive. Follow the instructions:
- Restart your PC and run the version that was moved to the flash drive;
- Open Windows Command Prompt;
- Enter the command shown in the figure below, giving the OS copies on the SSD a unique name;
In case of replacing or purchasing a new computer or laptop, when replacing the motherboard on the computer, you will have to either install the system from scratch or use the method of transferring all data and installed programs using a utility Sysprep. This is a built-in utility from Microsoft that helps the user prepare your system for transfer to new hardware without rearranging the operating system.
On startup sysprep Your operating system clears all information about installed , and unique information about the installed OS is also reset. The main thing that interests users in this method is that all data and installed programs will remain untouched. That is, you don’t have to make a backup and install all the software on your computer again. Microsoft warns that in addition to information about drivers and devices, information about the activation of your Windows will be lost, so you will have to activate your licensed Winodos 7 either by phone or via the Internet (with the exception of the OEM version). The OEM version binds activation to the hardware, so it can only be done over the phone.
We are starting to prepare our OS for the transfer.
To do this, run the (already installed) utility sysprep on the computer using the command (in the command line as an administrator, enter the line (Start - Run - cmd)):
%windir%\system32\sysprep\sysprep
A utility settings window should open with the following items and settings:
In point System cleaning action choose Go to the system welcome window (OOBE) and put a tick Preparation using.
In the parameter shutdown select an item Shutdown. You can also choose to reboot the system if you want to remove an image of this system by booting from a DVD or flash drive.
Do not boot after the Sysprep procedure on the same computer, as you will have to perform this procedure again before transferring to a new PC.
Click OK and wait until the system is restored to its initial form. After the process is completed, the computer will turn off. Now you can change the motherboard on your computer, or transfer it to a new computer.
When the Windows 7 operating system starts, it will install and detect devices.

The system may reboot (this is normal), and at the end of the installation you will need to select a language and configure regional settings.

Enter the date, standard settings, automatic system update mode, etc. step by step.
At the end of the installation, log in as the user Test, end the session and you can log in under the account you have always worked under. All that remains is to install new drivers and work normally on the computer.

Transferring Windows 7 with installed programs is not such a complicated procedure, which is carried out using the Sysprep utility much faster than a complete installation from scratch. But there are also some nuances in this method. Microsoft does not guarantee 100% operation of this method when transferring, for example, different chipsets, for example from Intel to AMD or vice versa. But in practice, there were cases where the system rose and worked without failures. If you are transferring with similar models and chipsets, then most likely there should be no problems or conflicts.
Good afternoon or pleasant evening, dear friends, acquaintances, regular and not so regular readers, and simply other individuals. Today we have a topic that has long been in demand by many, judging by your letters.
In this article (which, I hope, will not expand into several parts, which will be clear from your comments) I want to tell you about how you can comfortably move to SSD capacity, just nothing, say, in 60 GB without reinstalling the system and reconfiguring it from scratch.. Or how to simply move from disk to disk.
What you need to migrate Windows
Let's start with a little warning, because, as they say: " Forewarned is forearmed".
Note:
You follow the advice from this article at your own peril and risk, because sometimes the best solution is to simply reinstall everything. However, if you do everything according to the instructions, then there should be no problems.
So, when everyone is up to date, we can move on to the list of software/hardware that we will need (I hope there is no need to explain why bother at all SSD drive, they say that they are fast and all that).. However, you can read our small note: “”.
Anyway, to the point. Let's simulate the situation: You are the owner SSD storage capacity 60 GB And HDD storage, say, on 500 GB, which is divided into volumes (one of which is system) and you really need to move to SSD without reinstalling the system.
Let's see, in fact, what is needed for this.
From the pieces of iron we need:
- Myself SSD storage device. In this example, it is KINGSTON SV300S37A60G volume 60 GB;
- Any other drive with a larger capacity 60 GB(you can even take a flash drive to 64 GB). We need it to make a backup copy of the system, first in its original version, and then in the (“disfigured”) version in which it will be at the end of our relatively lengthy algorithm;
From the software we need:
- Acronis True Image Home(for example, 2013) - this is the main tool for us, with which we will build our own lifebuoy in the form of a backup copy of the system. Warning the cries that this tool is not free, I would like to suggest 30 trial days will help you. Of course, I understand that Rome was not built in a month, but 30 days are quite enough not only for our entire algorithm, but also for creating a boot disk (which, by the way, we simply need, especially if we do not have another hard disk at hand from which we could boot the working system);
- , – programlin is also not replaceable for us in this matter (however, there are also its analogues). With the help of this joy of life, we will resize disk volumes, as well as copy or move a disk volume. Regarding the paidness of this product, in fact, we look above, 30 days of freebies will help you;
- ProgDir, is a small utility for editing the registry. We use it, in this case, to move the default installation path to the location we need;
- SteamMover, - a small utility for transferring our programs from the system disk to another (while maintaining their functionality);
- Driver Sweeper, is a program designed to remove drivers; there was a separate article on how to use it on our resource; it is highly recommended that you read it (available).
It seems that we have figured out the software part of our toolkit. So we can proceed further.
Algorithm, process and actions
Let's start with a description of the algorithm of our actions:
- We take a backup copy of the system in working form;
- We are building the foundation, that is, creating additional folders and doing other necessary preparations;
- We clean the system, that is, we kill everything unnecessary, remove browsers and other software that we do not use;
- Copy or move the system volume;
- We optimize work SSD;
- We additionally install the programs we need;
- We take a backup copy of the working system.
Does everything seem simple? In fact, everything would be like this if not for one “but”: things don’t always go exactly as planned. Therefore, each of the points will be described in detail below, where I will try to identify all the pitfalls that may be hidden on the thorny path of executing the algorithm described above.
Step 1. Take a backup copy of the system.
Our many-hour journey begins by creating a starting point to which, if we suddenly break something, we can always return. Responsible for creating a backup copy, as mentioned above, Acronis True Image Home(We won’t dwell on the installation of this miracle of programming thought, because everything is quite simple there).
So let's start from the point where we launch the shortcut on the desktop and already in the program itself click on the section " Backups", where we see the following:
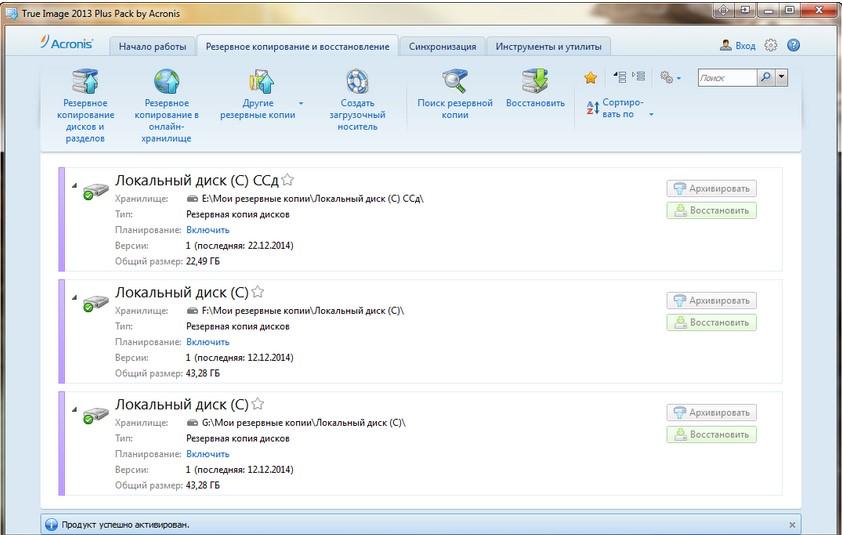
That is, either your old backups (in the screenshot above), or just empty space (if you have never created backups through this program before).
While we are waiting for the backup to complete, in general, you can drink some coffee (or whatever you drink or smoke), and then move on to the next point.
Step 2. Building the foundation.
Perhaps the simplest point. It involves creating additional folders (or a separate disk volume) to store our programs.
In general, here you can handle it yourself. What can you handle? Yes, just, for example, on the volume D:\ create two new folders: Program Files 2 And Program Files Old(or with any other names that you understand).
We need the first folder to install everything there new programs that we Not we want to keep on SSD, and the second folder is for those programs that Now installed on our computer and which we, again, Not we want to see in the future SSD-disk.
In general, now, without thinking too much, we brew some more tea and move on.
Step 3. Clean the system.
It is at this point, my friends, that we will be “stuck” for a long time. Since, in fact, at the time of moving within the framework of this article, my disk WITH:\ was the size 160 GB(of which a little less was free 60 GB) so, willy-nilly, I had to pick up the broom and begin a general uninstallation.
Let's start with something simple, namely CCleaner, which we use to clean all temporary files and other small items. If you don’t know how to do all this, then we have a special article for that: ““. On top CCleaner"or you can also go through the company's utilities Wise(article ).

The main thing here is not to overdo it and not to remove unnecessary things. Let us remember that the link to the material about the program was almost at the very beginning of the article.
Further more. Let's move along the path" Control Panel - Programs and Features"and it’s long + tedious, and also mercilessly three all the programs that we don’t really need (by these we mean, roughly speaking, those that you haven’t launched for about a month, that is, programs that are not essential). From my own experience I will say that Such software “garbage” can be found on almost any computer.

Naturally, even if we destroy all the garbage, we most likely will not achieve our cherished goals. 45 GB(and our goal, at least for the above stated SSD on 60 GB, just like that, because you can’t completely fill the disk). But.. Here we will resort to our “secret” weapon, namely the wonderful utility SteamMover.
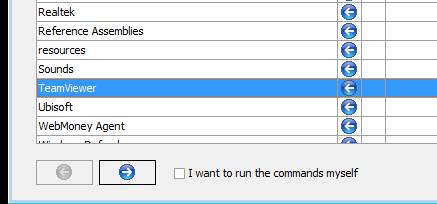
The program is completely free, does not require installation and is generally extremely easy to use (see screenshot below).

You can download this miracle of a programmer's thought, say, . Installation, I repeat, is not required - just unpack the downloaded archive and run the program from its folder.
As for use, on the left side, with three dots, we select where to transfer from, and on the right side, with three dots, we select where to transfer.
True, not everything can be tolerated harmlessly, and therefore it is not necessary. For example, it is better not to touch browsers and drivers, as well as all other programs to which plug-ins, extensions and other add-ons are connected. The same applies to, say, an office from small soft ( Microsoft) and such heavyweights as antiviruses + firewalls. But even with these restrictions, if we try not to touch too much and avoid constipation, we can achieve good results.
In case all this was not enough for you, then there is something else that can and should be done, namely, move the contents of the desktop, the folders my documents, downloads and everything of that kind, in fact, to other folders on another drive.

I think that you can handle this procedure on your own, fortunately you don’t even need any specific software and everything can be done by hand, fortunately the desktop, downloads, documents, etc. are perfectly accessible and open to your intervention.
If you didn’t fit into the target, then you’ll have to delete something... You know better what it will be.
Ufff.. Now the longest point has been completed and I hope that everything went off without unnecessary troubles for everyone, because this is the stage where you can ruin the normal operation of the system, but.. It’s not in vain that we made a backup copy;)
Step 4. Copy or move the system volume.
It’s done, a little remains, namely: the long-awaited copying/moving of a disk volume.
After installation, which will also not be difficult for you, we launch " Acronis Disk Director 11 Home":

- Initialization SSD. When we just connected our drive (with the computer turned off, of course), it is not yet ready for use and must first be initialized. There is nothing complicated here, just right-click and select " Initialization" if this did not happen automatically;
- Resizing the system volume. This is done very simply: select the disk and, in the corresponding menu on the left, select the desired item, and then we adjust our volume to the size SSD;
- We move the volume. The same menu is on the left, but this time there is a different item. Everything is simple, but if it’s difficult, you can rely on the screenshots below, although you just need to choose where to move something;
- We create a new volume from free space on a previously system disk or use it to expand, say, the same disk D:\.
Screenshots of the process:


That's all. Now press the button " Execute" in the upper left corner and, being patient, we wait, because the process is quite long. If for some reason it gives an error, it means that you did something when you cleaned the system and, most likely, you will have to roll back to a backup copy, and then repeat the process a little more carefully.
Step 5. Optimize the workSSD.
Wow it works (if it works ;))!
Do you feel how the system loads faster? Toli will still be available when we optimize the operation of our SSD. I won’t tell you how to do this, since there is already a wonderful article on this topic “” Read, do and enjoy the result.
Step 6. Install the necessary programs.
I think this point does not need any comments :)
Step 7. Take a backup copy of the working system.
Well then, dear friends. You have walked this difficult path with me (even if for some it may remain mental), and therefore all we have to do is consolidate the result by creating a backup copy of the system so that you can always deploy it in working order without unnecessary movements.. Well , but you already know how to do this, so..
Let's get to the afterword ;)
Afterword
To summarize, I would like to say that:
- Yes, it was difficult for some;
- Yes, it was tricky;
- Yes, it was a long time and, perhaps, for many it was a painful series of trial and error.
But, whatever one may say, it was still useful.
After all, it was thanks to this experience that we, I hope, all understood that to take and install and configure something from scratch would most likely be much simpler and less wasteful in terms of nerves and time. On the other hand, we do not always look for easy and simple ways, because in the process we learn, gain irreplaceable experience and all that.
I really hope that this article was useful to you, at least as a kind of collection of “harmful and useful advice.”
That's probably all for now. Thank you for your attention and, as usual, if you have any questions, thoughts, additions, etc., then welcome to comment on this post.
PS: Thanks to a team member under the nickname for the existence of this article Harry_Sol. For now, we ask you not to judge strictly, because this is the first printed material for him, because we have more than all the videos on it, but look, we’ll make a writer out of him;)


 and creating image ads")


 – we understand sockets, keys, sizes and purposes")

 Combat System")


 – we understand sockets, keys, sizes and purposes")

 Combat System")